The wild melting pot called Brazil
 All eyes are turned to Rio De Janeiro Brazil and the Olympic games right now. I am always fascinated with the Olympic games. I’m drawn in by the talent, commitment and determination of the athletes that stuns me in and the amazing diversity of all of the participants and their varied backgrounds. As usual, I ultimately end up being curious about the country hosting the games and their culinary world.
Turns out Brazil has a very interesting culinary history that is just as diverse as the athletes competing in their fair city right now. Brazilian food is best understood in layers of colonization that has happened there over the years. The foundation of the food is from the native Indians, the first people, then the Portuguese arrived in the 1500s to this lush land to bring their cuisine. Over the next three centuries, the slave trade brought over 5 million Africans to Brazil, along with their diverse traditions. The Germans arrived in the first half of the 19th century, in the second half of the 19th century the Italians, plus a liberal sprinkling of Syrian and Lebanese arrived. The first half of the 20th century brought a major immigration of the Japanese and now Brazil is home to the second largest Japanese population outside of Japan. Wow…
On top of that, there are 5 distinct regions of Brazil and different culinary delights in each. This is easy to fathom as Brazil is almost the size of the United States, only being a smidge smaller. But despite the wild melting pot of cultures and cuisines that fed the development of Brazilian cuisine there are certain staple ingredients that are common to almost every region.
One of those staples is a gift from the indigenous people, yucca root also known as manioc or cassava. This food has been the cornerstone of Amazon cooking for over 7,000 years. When the Portuguese first settled into Brazil, they tried to raise wheat, failed, and then adopted the native flour made from the yucca root. Consequently, cassava has spread throughout Latin cooking. It is used liberally in Brazilian cuisine from yucca fries (which are supposed to be amazing) to sprinkling the flour on foods as they fry them. It is best known for its use in the national dish, “feijoada” which has 3 more of the Brazilian staples in it, black beans, rice and meat.
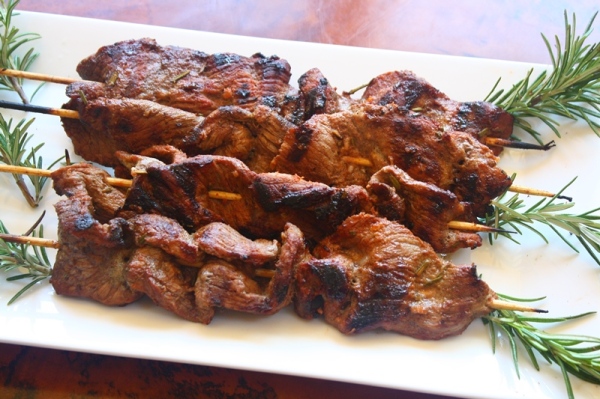
Yes, Brazilians love their meat. Their neighbors to the South of them in Uruguay and Argentina are more famous for their meat heavy eating but the Brazilians are right in there too, cooking their beans in many meaty concoctions. They also love roasted skewered meats done over the fire. Usually the spices are light and the meat is roasted and eaten right off the skewer. In Brazil it is called “churrasco” and amazingly enough it was another gift from the indigenous people, in a more round about way.
When cattle first made its way to South America the 17th century, the most likely people to tend the cattle were the indigenous people that knew the back country well and didn’t mind living out under the stars. These guys were called “tropeiros” which not only means cattlemen but also means cattle bird that travels with the herds. As the tropeiros were traveling with their cows they would slaughter one and eat it on skewers over the open fire with a bit of salt, pepper and whatever else they could use in the wilderness. Eventually this caught fire, (pun intended) and spread throughout the cattlemen and the countries that have cattle down there.
Over the years the churrasco has been elevated to new heights and with the influence of the Italians, turned into a big deal where expensive cuts of meat are served in courses that one pays a lot of money to go experience at restaurants. But the common person still roasts humble cuts simply on the BBQ with a few spices and serves it with rice and beans. This recipe has the elements in it that are commonly used in Brazil today.
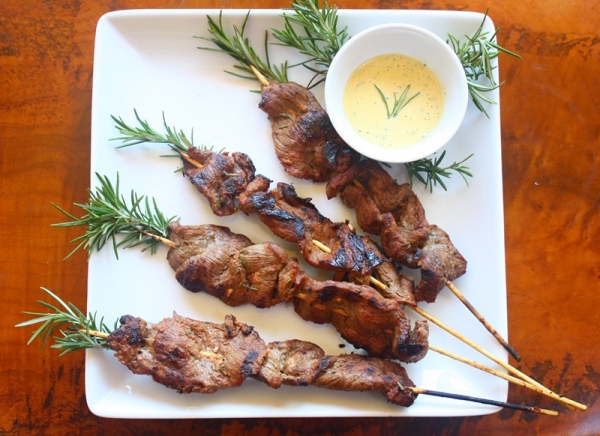 Brazilian style beef skewers ala Olympics
2 pound rump roast (of preferably grass fed) beef
1/4 cup of olive oil
1/4 cup of orange juice
1-3 garlic cloves, crushed (Depends on how garlicy you want it!)
1-2 teaspoons of cumin
1 teaspoon of paprika or (my favorite) smoked paprika
1/4 teaspoon of cayenne pepper
Salt and pepper to taste
Get ready to preform your best. You’ve been training and it’s gonna pay off here! Start with cutting the fat off the roast and then trimming it into strips. Whisk together the rest of the ingredients in a sturdy glass or ceramic bowl and then toss the beef in the marinade. Stir the beef strips around in the marinade till the strips are all well covered then tuck it into the fridge to marinate for 2-8 hours. (I like to make mine in the morning) While the beef is marinating soak your wooden skewers in water. (There are stainless steel skewers that you can buy that are more South American style but wooden ones are cheap and easy.)
When you are ready, thread the beef onto the skewers and lay in a glass baking dish. Preheat your gas BBQ to medium and then lay your skewers on the hot grill. Cook 2-3 minutes on each side. It won’t take long! If you want to do a more traditional Brazilian skewer, roast on an open fire. Salt and pepper it to taste and serve with rice, black beans and lemon wedges. Gold metal win here!
A love letter to carrots, way overdue
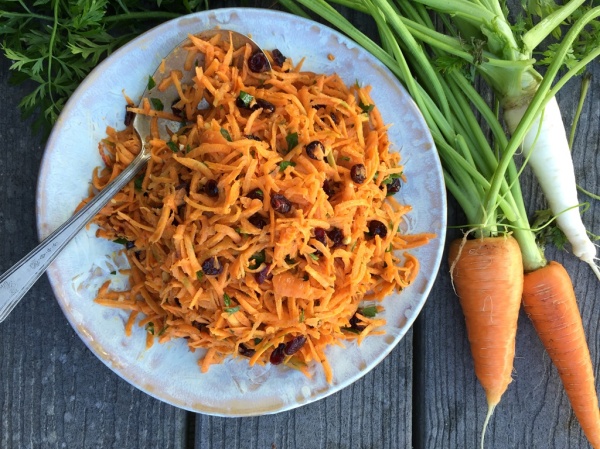
Moroccan-ish Carrot salad
Dear carrots;
I want to apologize for ever taking you for granted. I have always just seen you as a vegetable in the background like that completely unremarkable music in the doctor’s office. It is easy to take you for granted because you are always in the vegetable isle come rain or shine or season. You are a cheap and easy date that is always there for me no matter how I treat you.
I have marveled and written about your feathery tops and made an outrageous carrot top pesto that rocks everyone’s world. Oh and your carrot cake, dear lord what a masterpiece that is! I have waxed poetically about that numerous times concocting many riffs on it from cookies to ice cream. But I am sorry to say I have not written about you, just little ole’ you.
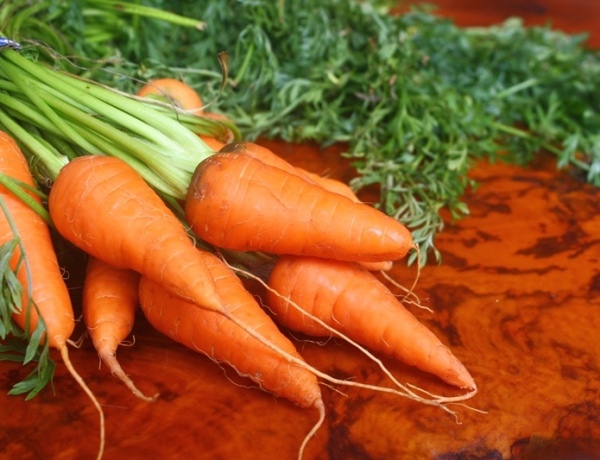
Beautiful carrots out of the garden
But I am a changed woman now that I have my own garden and am growing your lovely kind in bright and happy colors of purple, white and orange. I realize how tiny weeny your seeds are and how tough it is to make a straight row and then when it is time to thin your rows how hard it is to choose which of you must go! Each one of you are my babies! Yes, I have changed.
I am here to sing your praises and trumpet on high about how you are in the height of your season right now, no matter that you are available all year, this is your time to shine. When I pluck one of you from the garden, rinse you off and bite into you, your crunchy carrot flavor bursts in my month and I am humbled. How could I take advantage of you? You mean so much more to me than I have shared.
Not only are you delicious but your nutritional benefits are astounding as you are popping with beta carotene and fiber. Dear carrot you so graciously share your vitamin A, C and K and other impressive nutrients with us so that we can have lower cholesterol and blood pressure, boosted immune systems and maybe even see a bit better in the dark.
On top of being a nutritional powerhouse you are so versatile! You go so well in just about any dish. I love you cooked, fresh and anything in between. I love you in stews, soups, salads, stir fries, desserts and just about anything else but particularly raw and fresh out of the garden. Yes, my beloved carrot, you are amazing and I promise to never take advantage of you again.
To show you my devotion I am making a salad that highlights your vibrant color and sweet flavor. It has been a favorite in in the Middle East since the early 1940’s when raw carrots were a new and wild thing to put on the table. Before that you were only served cooked with a similar dressing to this raw salad.
This salad has been jazzed up a bit to celebrate you, dear carrot, with the use of cinnamon and cayenne but I think it does you justice. After all, this is your season to shine and to take the main stage instead of just being a supportive roll, like you always get relegated to. I have made a few versions of this that I am also sharing to really get in the carrot spirit!
Thank you carrots. I love you.
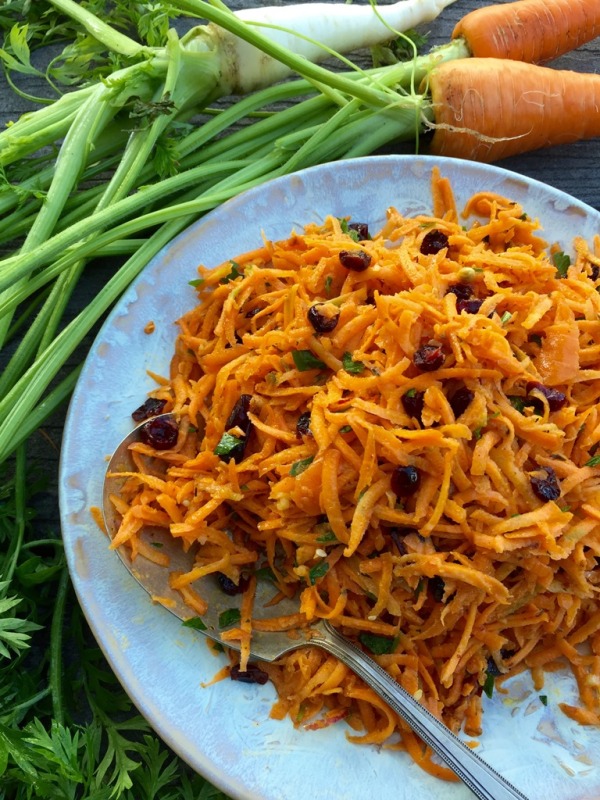
Moroccan-ish carrot salad
Moroccan(ish) raw carrot salad
Adapted from a recipe on Epicurious.com. Serves 4.
1 pound of grated carrots (4 cups of grated carrots)
The dressing
1/4 cup of extra virgin olive oil
3-4 TBLS of fresh lemon juice (One fat lemon does it)
1 tsp of honey
2-4 cloves of pressed garlic (Depending on how garlicy you like it)
1 tsp of ground cumin
1/4 tsp of ground cinnamon
1 tsp of sweet paprika
1/4 tsp of salt
A pinch or two of cayenne pepper (optional)
The extras
1/4 cup of chopped fresh parsley or cilantro
1/2 cup of dried cranberries or raisins
Grate your carrots up and set aside. (I tell you, if you do this in the food processor it is a snap!) Mix up the dressing ingredients in a small bowl and whisk it up until well blended.
Pour over the carrots and then mix well until all the carrots are covered in a fine blanket. Toss in the parsley and the dried cranberries or raisins and mix some more.
Set in the fridge for at least 2 hours and preferably overnight for the flavors to really develop. Enjoy this super food!
-Variations to try;
-Turkish Carrot salad with yogurt; Substitute 1 cup of plain yogurt for the lemon juice.
-Moroccan Carrot-orange salad; Omit the cumin and add 1.5 tsp of orange blossom water or 1/2 cup of orange juice then 1/4 cup of chopped fresh spearmint instead of the parsley/cilantro.
-Moroccan cooked salad; (The traditional way) Don’t grate the carrots but cut them into round slices and gently boil them till crisp-tender. Drain and rinse in cold water and drain again. Toss with the all the above ingredients and serve chilled.
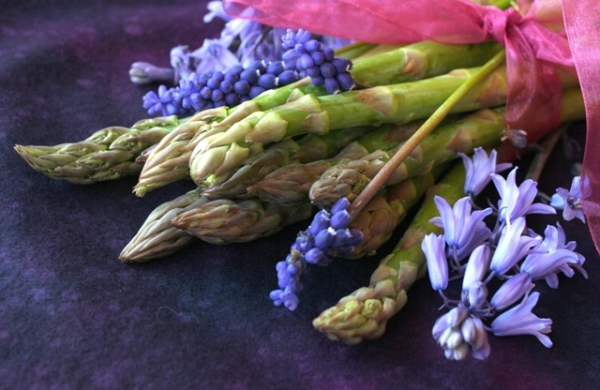
Asparagus; the King of Vegetables
“Asparagus inspires gentle thoughts.” Charles Lamb
 We have visiting royalty among our seasonal vegetables right now, Asparagus. It even has a crown to prove it. It was given the honored title, “king of vegetables” in the 18th century by King Luis the XIV, who could not get enough of it. He was the first to come up with year around green houses so he could eat it all the time. Fortunately for globalization, we don’t have to face the guillotine to have it whenever we want, but it is particularly perfect in the early spring.
There is something about asparagus that commands respect and adoration. Its tall slender head, held high, almost demands that we dress for dinner. Its history is shrouded in mystery, like a good politician. Some think it originated in Asia, some in Egypt, but no matter where it came from it always is given a place of honor on the table.
As expected asparagus rules in nutrition being rich in Vitamin C, K and A and a superior choice in folates. Folates promote the health of our cells, in repairing them structurally. Folates are also king in keeping your heart healthy. One cup of steamed asparagus contains the pittance of 48 calories, no fat or sodium, but great assets of fiber and nutrients.
The Northwest is the perfect place to grow asparagus as this monarch likes sandy soil and cooler climates. Be prepared to invest in a long term relationship though, as once you start an asparagus bed, it will grow for 20 to 30 years. It likes to be pampered and well cared for, with regular compost pedicures and bowing down to weed it yet the rewards are treasured.
Make sure and buy asparagus that are full, heavy and smooth looking. Those that have a dry shriveled appearance have been de-throned. Honor these royalties by placing a wet paper towel, secured with a rubber band, around their feet and store in the fridge in an open plastic bag, their crowns out. Remember that asparagus hardly needs cooked at all, just steamed for a few minutes. If you are going to be using them in a salad, plunge them in a cold water bath immediately after steaming them, to keep from getting bedraggled and dull.
To prepare asparagus, give them a good washing and them snap off the tough woody stems. Asparagus is ready and willing to help as it will snap off in the perfect spot. There are so many wonderful ways to honor this vegetable in the kitchen. You can eat them raw, steamed, grilled, roasted, tossed in pasta or whatever. Use your imagination with this elegant vegetable. Here are a few fun and different ways to serve asparagus.
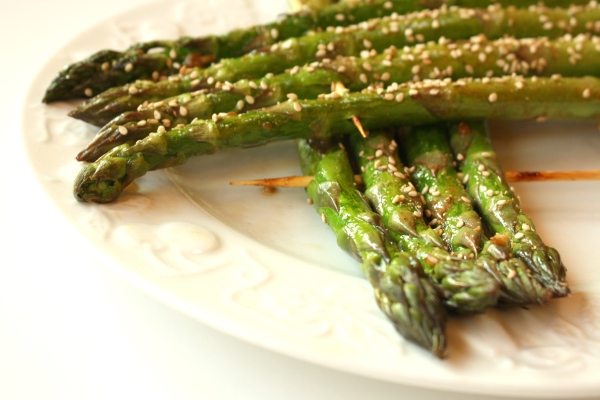
 Grilled Asparagus Royalty Rafts
Here is a great simple recipe from “Cooking Light” that I purely adore. You can skip the skewers and grilling all together and roast on a baking sheet on the top rack in the oven at 400 degrees, for three minutes, then stir and roast another 3 minutes. Easy!
16-20 thick and tender asparagus spears, snapped
1 tablespoon of low-sodium soy sauce
1 tablespoon of dark sesame oil
1or 2 garlic cloves, crushed
2 or 3 teaspoons of toasted sesame seeds
Few cranks of black pepper
Bamboo skewers
Soak the skewers in water for about an hour so you don’t light anything on fire. Lay the spears flat, four or five in a row on a cutting board. Thread the skewers through the asparagus horizontally, one skewer at the bottom and one at the top of the stems. Some of the spear may spilt, so go slow to avoid this. There are your little kingly rafts! (Aren’t they cute?)
Combine the soy sauce, oil and garlic in a small bowl and whip up. Brush the mix over the rafts of asparagus then grill them on a hot grill or under the broiler in the house. Be careful and watch them closely. Don’t walk away! They only need to be grilled 3 minutes on each side. Take off the grill and sprinkle with the sesame seeds and few cranks of pepper. Serve right away to lucky loved ones.
Lemon Asparagus Ribbon Salad
The ribbons on this salad are almost luminous. Very beautiful.
Around 1 pound of asparagus
1 ½ cups of cherry tomatoes, halved
2 or 3 tablespoons of fresh chopped chives
2 tablespoons of fresh squeezed lemon juice
1 tablespoon of olive oil
1 teaspoon of Dijon mustard
A few cranks of pepper
Pinch of salt
½ cup of crumbled feta
Okay, let’s start with the tricky part, making asparagus ribbons. First wash you asparagus and then cut off the tips and save for another use. Hold one spear over a bowl and run a potato peeler down it to make ribbons. This is easier said than done, but with a bit of practice you can get beautiful ribbons. Toss the ribbons and the red tomatoes together. Then mix the chives through the salt in a small jar and shake it up. Drizzle the dressing over the ribbons and tomatoes and gently toss to blend. Plate and sprinkle with the snow white feta. Beautiful and delicious!
Dr. Miles Hassell is my new hero
 “The decisions we make about the food we eat and our exercise and sleep habits are more important than the decisions our physician will make.” Dr Miles Hassell
The Year of Wellness (YOW) in Tillamook County is in full tilt boogie right now and picking up speed. Next month’s focus for The Year of Wellness is nutrition and so the YOW team is bringing an amazing speaker, Dr. Miles Hassell from Portland, to our area to get us all inspired. This free event will be on March 11th from 11 am to 2 pm at Fresh! Café and Market in Bay City and requires reservations.
Dr. Hassell is an internist that believes good food is great medicine. In fact that is the title of his book he co-authored with his sister, “Good Food, Great Medicine, a homemade cookbook, recipes and ruminations from a medical practice.” Their book is a very well written and a highly entertaining read, which I recommend for anyone. If you haven’t quite found the inspiration to get on the band wagon for YOW yet, this book and/or event will do it.
 I can tell I am going to love meeting this guy cause he talks my language; whole foods. Dr. Hassell stresses that eating whole foods, and mostly vegetables and fruit, combined with exercise and good sleep patterns are the way to radiant health. Simple, attainable and at everyone’s fingertips. He says that eating whole foods not only reduces risk but can actually reverse disease.
For example, Dr. Hassell says if someone already has heart disease that they can reduce the risk of future cardiovascular events, like a heart attack, by 70 percent or more with diet alone and 60 percent or more with exercise. “That’s better than we see from our best medical procedures and drugs!” he continued “And we find the combination of conventional medicine and foods and exercise to give even better results.” I tell you this guy’s is spot on and going to be right here in our county to talk to us.
This special event requires a reservation so call Stacie at 503-812-2062 for your spot which includes a free healthy lunch. The day after that, on March 12 from 10am to 1pm, I will be teaching a free cooking class in conjunction with recipes from his book at the Methodist Church in Nehalem. It will be an inspirational class on basic cooking to get you in the kitchen, then we will munch on what we made. Call Laura Swanson at 503-939-5416 or email her at laura@nehalemtel.net for reservations to the cooking class. I’ll see you there!
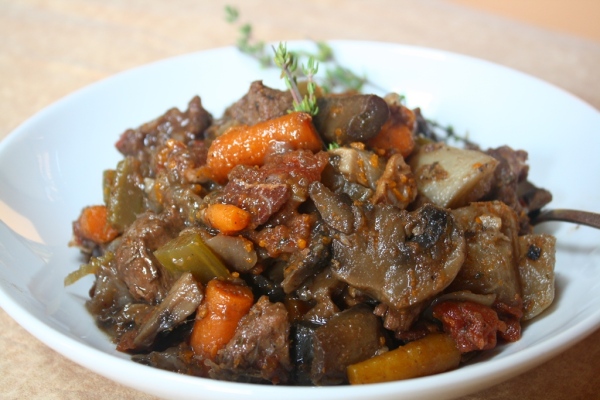
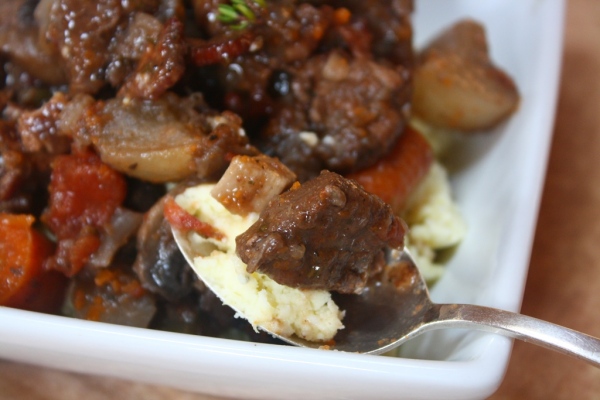 Hassell’s Red Wine Beef or Venison
Here is a recipe from Dr Hassel’s book, spiced up a bit by me. To reduce prep time, I’ve been known to leave out the step of browning the meat. It shortens the prep time but does not compromise on the flavor too much. The bacon is one of my additions as it adds so much flavor and is just a wee little bit of bad. Omit If you want to be very very good.
2-3 tablespoon of high heat oil like coconut oil or avocado oil
A few pieces of good center cut bacon, cut into small pieces
3 pounds of venison or beef stew meat
2 teaspoons of cracked black pepper
2 teaspoons of salt
2 TBLS of paprika
1 pound of carrots sliced into 1 inch chunks
2 fat yellow onions cut into chunks
2-6 garlic cloves, minced
1 750 ml bottle of a good dry red wine
1 tablespoon of tomato paste
1 28 ounce of canned crushed organic tomatoes
1 teaspoon of dried or 2 teaspoons of fresh thyme
1 tablespoon of minced fresh or 2 teaspoons of dried parsley
1 tablespoon of minced fresh or 2 teaspoons of dried rosemary
1 pound of mushrooms sliced
Salt and pepper to taste
Preheat the oven to 350 degrees. Heat up your olive oil in a heavy dutch oven you could knock a bear out with (Or a heavy bottomed soup pot) and cook the bacon chunks over medium heat for 10 minutes, stirring occasionally until the bacon is fragrant and lightly browned. Remove the bacon with a slotted spoon to a plate with a paper towel on it and blot off the excess fat.
While the bacon is cooking, lay your venison cubes out on a cutting board and dry them with a paper towel, (no I’m not crazy, this makes the meat brown better) . Mix the salt, pepper and paprika into a small bowl till well mixed and sprinkle it over all sides of the meat. When the bacon is done, sear the cubes in the bacon fat/oil mix in small batches of a single layer of meat for 3-5 minutes, turning to brown on all sides. Remove the meat with your slotted spoon when browned to a bowl and finish searing the rest. (If you need more oil, add a TBLS or 2 when you need it)
After the meat is done, toss in the carrots, garlic and onions and cook for 10 minutes or so stirring occasionally until the onions are lightly browned. Add the meat and bacon back to the stew pot and add the rest of the ingredients. Turn off the burner and stir the pot till everything gets to know each other. (This step can be done the night before and stored in the fridge till you are ready to cook it)
Place the pot into the middle of the oven and stand back and let magic happen. Cook for two hours while the house fills with the most amazing scent that will bring people off the streets. Carefully take out of the oven after two hours, taste and adjust the seasonings, then serve with a salad.
Don’t be a caveman; eat your Brussels sprouts
“We kids feared many things in those days – werewolves, dentists, North Koreans, Sunday School – but they all paled in comparison with Brussels sprouts.” Dave Barry
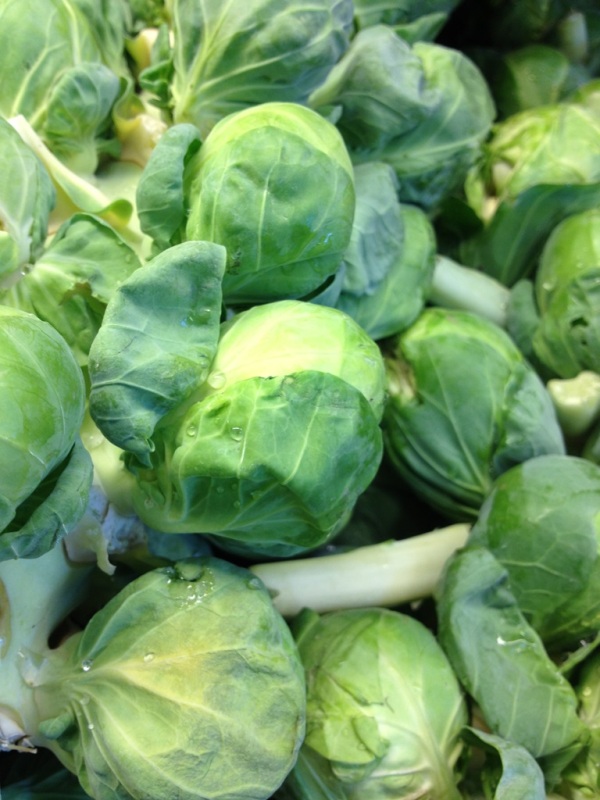 Brussel sprouts have about as clouded of a history as they do a reputation but it is a widely accepted that they were cultivated from the great mother cabbage. In fact, all brassicas, like broccoli, kale, kohlrabi, and cauliflower are descendants from the venerable cabbage.
People took the cabbage and bred it into umpteen million different kinds of leafy greens and brassicas. You see, the cabbage used to be very important crop to the world due to its high nutritional content, great winter storage and its ability to grow in crappy soil and weird, cold conditions. For many years, in many places, the cabbage is what kept the human race going nutritionally. It is not a coincidence that just about every culture in the world has a recipe for some sort of pickled cabbage, you know like sauerkraut, kim chee, suan cai, etc.
Somewhere around the 5th, 13th, 15th 17th or 18th century, Brussels sprouts were birthed in Northern Europe, most likely in Brussels. No one really knows. It is figured that they were cultivated to avoid freezing like regular cabbages do in the Northern climates. Their small buds on a stock grow faster and so get harvested quicker. They are basically a fast growing “mini me” of the cabbage.
This cruciferous vegetable contains 2-3 times the amount of phytonutrients called glucosinolates than are found in any other brassica. This chemical boosts DNA repair in cells and appears to block the growth of cancer cells. (It is interesting to note that Brussels sprouts grow in a double helix pattern like DNA.) And that is a reason to love Brussels sprouts.
The reason to hate them is that there is another beneficial cancer blocking chemical, phenylthiocarbamide (PTC), which is either bitter or tasteless depending on one’s genetic makeup. This gene has been linked back to our Neanderthal ancestors who were wired with this gene that “bitter equals poison.” Oddly enough, Homo sapiens with no Neanderthal genes in them do not taste PTC, so if Brussels sprouts taste bad to you, you have caveman genes. Now you know.
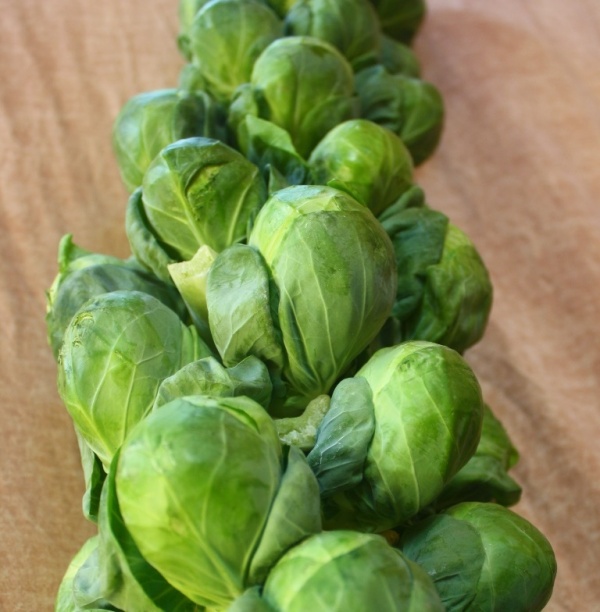
Brussel sprouts are best bought on the stock, if you can find them
There are some ways to make sure Brussels sprouts taste good no matter what your gene pool is. First, make sure that they are very fresh. Brussels Sprouts grow on stocks and sometimes you will find them artfully so at a grocery store. This is the way to buy them if possible because they are most likely fresh. If they are sold loose, inspect them carefully to see if they are dry or have yellow or discolored leaves. That is a sign they are fairly old and will taste stronger in the undesirable flavor. Also look for dense, heavy sprouts that are tightly compacted to determine the best ones to enjoy.
Second, it is very important how you cook them. Do not boil them as you will lose many of their dynamite nutrients and they taste awful. Cooking them by dry heat methods like roasting, sautéing, and even grilling is best. Water leeches flavor as well as nutrients and cannot produce the intensity of flavor that dry heat methods can. Whatever way you cook them, DO NOT OVERCOOK THEM!! That is the sure fire way to kill Brussels sprouts and give your children nightmares.
Indisputably, Brussels sprouts are most sumptuous when combined with a rich pork product like bacon, prosciutto or pancetta. (What isn’t better with bacon??) This basic recipe that I am humbly offering up here is the perfect way to cook them. (And it is easy too!) I have included many variations on the theme which a few include bacon, of course. Just don’t overcook them or you will hate them whatever your genes pool is.
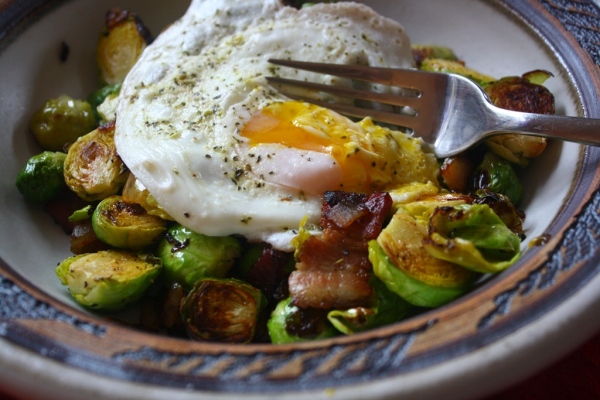
I love an egg on my brussel sprouts in the morning. Delish!
Basic Roasted Brussels Sprouts (even a caveman would like)
1 1/2 pounds of Brussels sprouts
2-3 tablespoons of olive oil
3/4 teaspoon of salt
1/2 teaspoon of ground pepper
Sprinkle of red pepper flakes (Optional)
Preheat your campfire (oven) to 400 degrees. Prepare your Brussels sprouts by peeling off the ends and any yellow outer leaves then cutting them into halves. Place them into a bowl and toss them with the olive oil, salt and pepper. Then pour them out into a baking dish and spread them out to a single layer. Roast for 20-30 minutes, on the top shelf of the oven, stirring once during the baking time. You know they are done when they are just getting tender but still bright green in color. Taste and adjust the salt and pepper then serve immediately. (Some people swear by a little extra salt on them)
Variations
Bacon roasted Brussels sprouts
Before you roast the Brussels sprouts, cut up 2-3 pieces of thick center cut bacon into matchsticks and sauté in a heavy skillet then pour bacon grease and bacon pieces on the Brussels sprouts in the bowl and toss with salt and pepper. (if they seem a bit dry add a tablespoon of olive oil) Roast 20-30 minutes, on the top shelf of the oven till done.
Bacon walnut cranberry roasted Brussels sprouts
Do the same technique as above but add 1/2 cup of chopped raw walnuts with the bacon and sauté together. Roast like the basic recipe. After the Brussels sprouts have roasted, toss ½ cup of dried cranberries with the sprouts.
Garlic roasted parmesan Brussels sprouts
Do the same technique as the basic roasted Brussels sprouts but add three to four cloves of minced garlic to the sprouts when you toss them with the olive oil. Roast as directed in the basic recipe except half way through the roasting when you stir them, sprinkle them with 2-4 tablespoons of grated parmesan cheese. Continue to roast till done.
